Developer Guide
- Table of Contents
- Developer Guide
Acknowledgements
addressbook-level2
addressbook-level3
Setting up, getting started
Refer to the guide UserGuide.
General notes
Only relevant attributes/associations/methods will be included in the UML diagram. Some of them are omitted to avoid confusion.
Design
Architecture
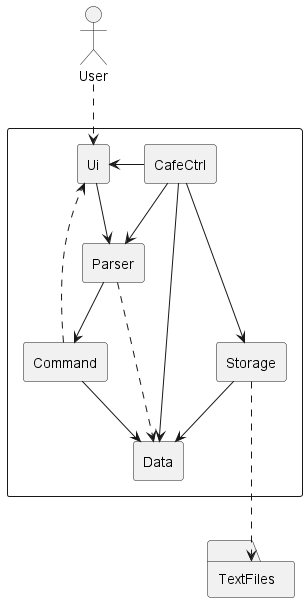
Figure 1: Architecture Diagram
The Architecture Diagram given above explains the high-level design of the App. Listed below is a brief summary outlining the primary components and their interrelationships.
In summary, the user interacts with the Ui components, initiating a sequence that involves:
Parsercomponent for command interpretationCommandcomponent for executionDatacomponent for managing application data
The Storage component mainly handles interaction with external text files and main coordinates the interactions between the various Components.
The bulk of the app’s work is done by the following components:
Ui: The UI of the App.Storage: Reads data from, and writes data to, the text files.Data: Consists of all the classes that are involved in execution of commands.Parser: Makes sense of user input to return the appropriate commandCommand: Executes the command requested by the user.
How the architecture components interact with each other
The Sequence Diagram below shows how the components interact with each other for the scenario where the user issues the command bye.
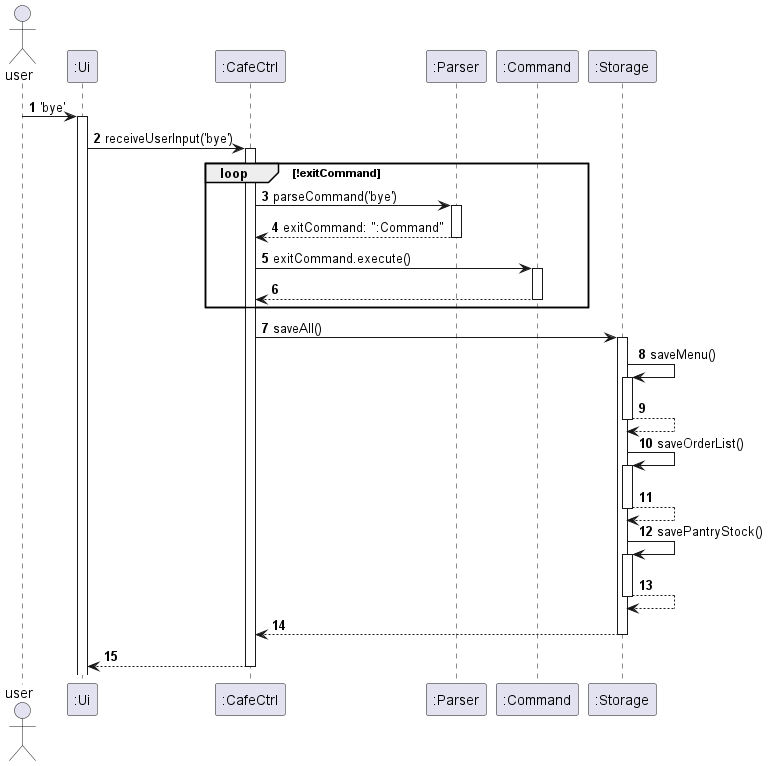
Figure 2: Architecture Encode Sequence Diagram
- User enters the command
byeto theUi Uipasses the command as a string through the methodreceiveUserInput('bye')inCafeCtrlCafeCtrlpasses the string toParserthrough the methodparseCommand('bye')Parserreturns a newexitCommandobjectCafeCtrlcalls theexecute()method ofCommandand returns after execution is completed (Step 6)CafeCtrlcalls thesaveAll()command inStoragebefore terminating the applicationsaveMenu(),saveOrderList(), andsavePantryStockare executed within thesaveAll()method (Steps 8 - 13)- Application terminates.
Ui component
API: Ui.java
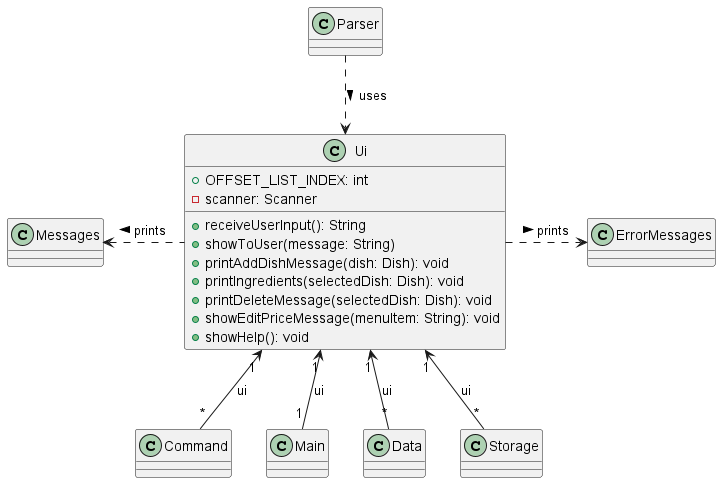
Figure 3: Ui Class Diagram
The Ui component is responsible for interacting with the user. Within CafeCtrl, Ui is instantiated by Parser, Command, Main, Data, and Storage components to access the print methods in Ui.java.
In the Ui component,
Ui.javaconsists of multiple methods that received the user input and prints messages to the system console for users to seeMessages.javaconsists of multiple strings that contains greeting, command, and goodbye messages to be shown to userErrorMessages.javaconsists of multiple strings that contain error messages to be shown to user when an incorrect command or exception has been returned
Parser component
API: Parser.java

Figure 4: Parser Class Diagram
The Parser component is responsible for interpreting the user’s input and return appropriate Command for execution. If the input is unrecognisable, Parser will return an IncorrectCommand which will display error message to the user through Ui.
CafeCtrl only have access to the interface ParserUtil although the run-time type object is Parser. With this, we are able to decrease coupling between CafeCtrl and Parser, allowing for easier maintenance. This also ensures the testability as we could provide mock or stub dependencies during testing, we could isolate the behavior of the class and focus on unit testing without external dependencies.Below is the sequence diagram of a parser which shows how Parser parses user input:

Figure 5: Parser Parsing User Input Sequence Diagram
When user input string is received through Ui, which passes the full user input to Main. Main then passes it to Parser via parseCommand for interpretation. In parseCommand, it finds the matching keyword for different command from the user input, it calls the respective prepareCommand method within itself. prepareCommand then generates the corresponding command class and return it to parseCommand, which returns the Command back to Main for execution.
Storage component
API: Storage.java
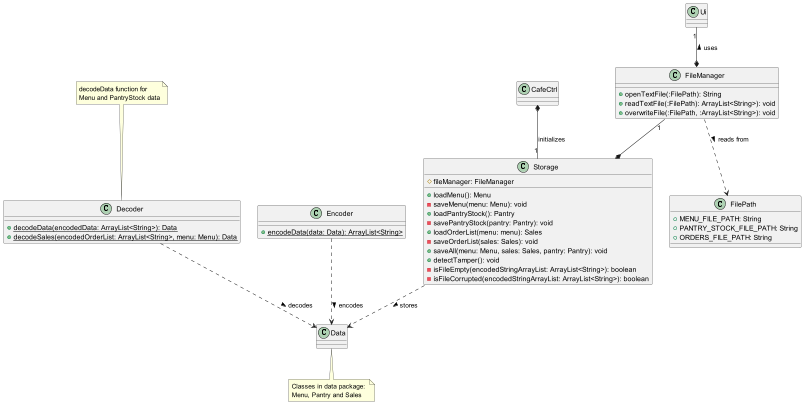
Figure 6: Storage Class Diagram
The Storage class,
- loads and saves the list of dishes on the
Menu, available ingredient stock inPantryand orders for the day inOrderListin a text file. - detects if the file is tampered by the user by reading the hash number in the storage text files
- depends on
Menu,PantryandSalesobjects (which are found in the data package). - is composed of
FileManagerobject as the text file needs to be located first before reading or writing.
Data component
Folder: Data
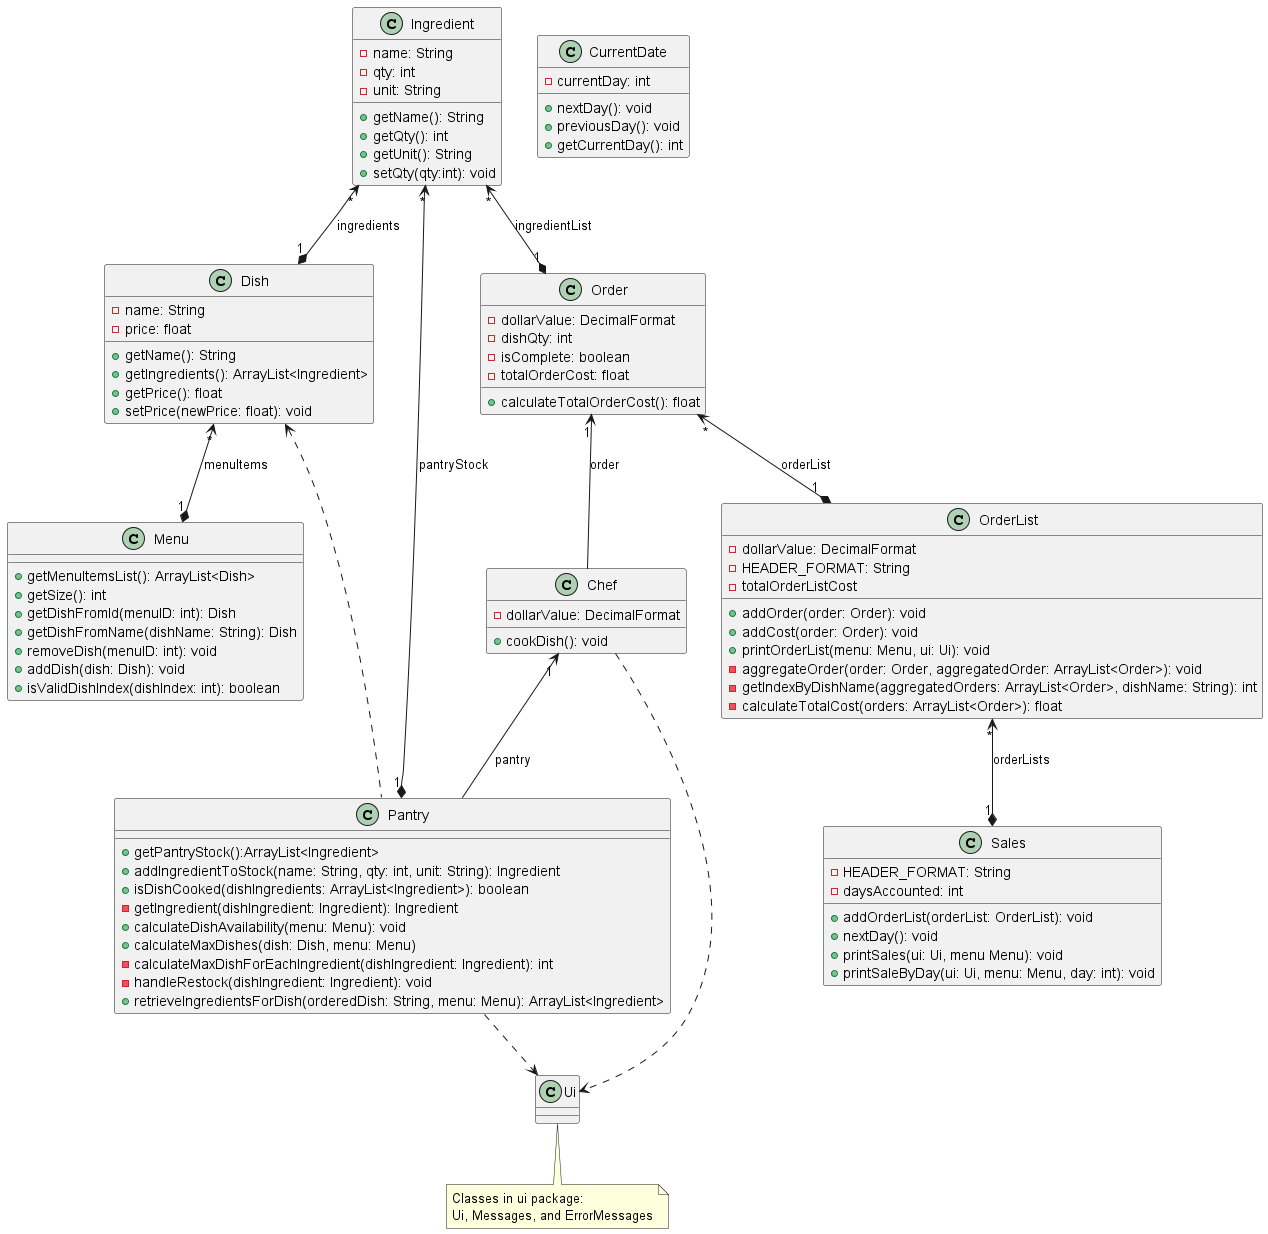
Figure 7: Data Package Class Diagram
The ‘Data’ package consists of all the classes that the commands interact with to perform various functions. A summary of the class diagram is as listed below:
- Each
Dishwithin theMenuis constructed with a set ofIngredientinstances, forming a one-to-many relationship withIngredient. Pantryis instantiated with an ArrayList ofIngredients(pantryStock), forming a one-to-many relationship withIngredient.- The
Chefclass has a one-to-one relationship withPantry, ensuring access to necessary ingredients for dish preparation. - When an order is placed, the
Orderclass is instantiated with an ArrayList ofIngredient(ingredientList), forming a one-to-many relationship withIngredient. OrderListis instantiated with an ArrayList ofOrder, forming a one-to-many relationship withOrder.Salesis instantiated with an ArrayList ofOrderList, forming a one-to-many relationship withOrderList.- Lastly, the
CurrentDateclass keeps track of the current operating day of the cafe.
Feature
Add Dish

Figure 8: Execution of add Command Sequence Diagram
API: AddDishCommand.java
The add command, add a dish to the Menu object and prints out a formatted message to state the name, price and ingredients entered for the dish.
when the execute() method from AddDishCommand is called in the main class CafeCtrl, the addDish() method is first called to add the Dish object to the Menu. It will then call the printAddDishMessage() method, which gets all the parameters of the Dish object (dishName, dishPrice, dishIngredients) and passes them to the Ui to then be printed out to the User.
Separation of Concerns was applied to ensure the Ui is only responsible with only displaying messages while the Menu deals with the logic of adding dish to the menu. This implementation also encapsulates the details of adding a dish and displaying messages. For example, The AddDishCommand class doesn’t need to know how the internal details of the dish adding and message printing are performed.
List Menu
A list_menu command can be used to display all the Dish objects stored in Menu.
The following class diagram illustrates the relationship between the respective classes involved in the creation and execution of a list_menu command.
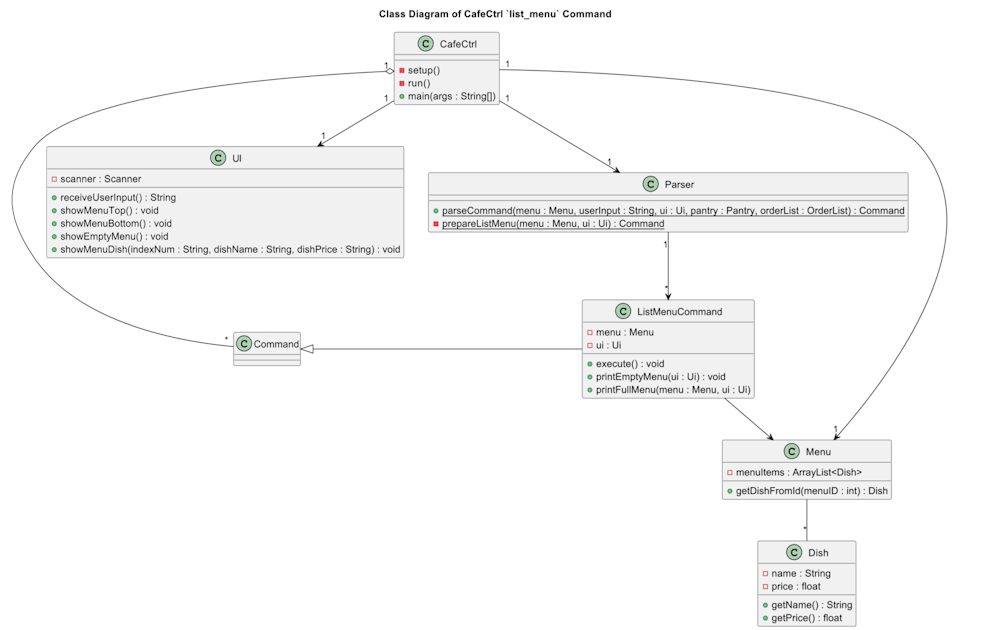
Figure 9: Execution of list_menu Command Class Diagram
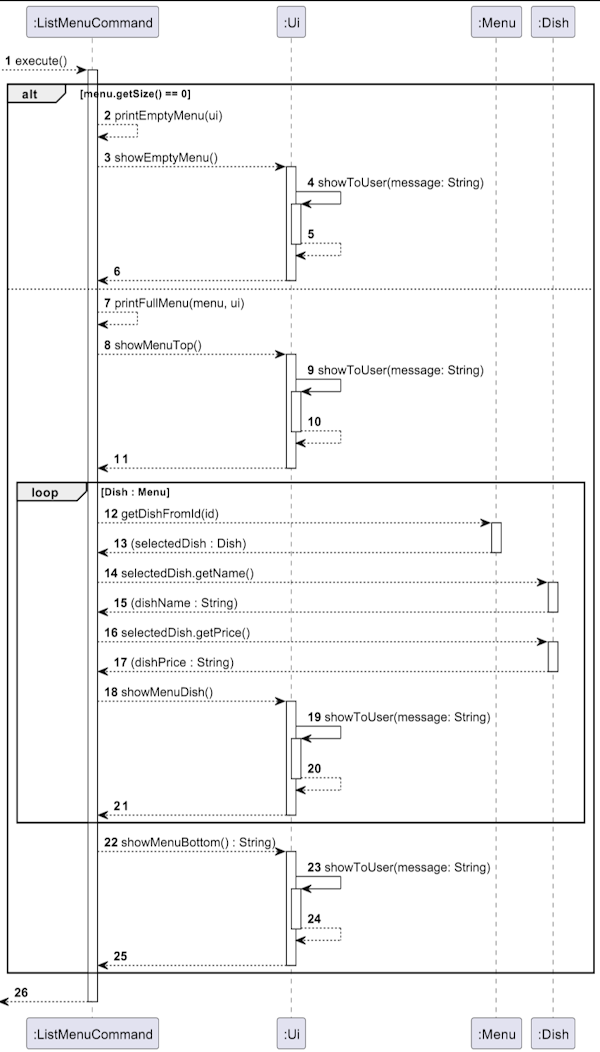
Figure 10: Execution of list_menu Command Sequence Diagram
API: ListMenuCommand.java
When the execute() method of ListMenuCommand is invoked in Main, it checks if the size of the menu by running menu.getSize().
1) If the menu is empty, it will call its printEmptyMenu() method to display to the user a MENU_EMPTY_MESSAGE in the Ui object and returns afterward.
2) If the menu is not empty, it will call its printFullMenu() method.
printFullMenu() will first print the top portion of the menu using the Ui object.
It then iterates through the Dish objects in Menu in a “for” loop, using menu.getDishFromId() to retrieve the Dish object.
The dishName and dishPrice are both access from Dish Class using getName() and getPrice() respectively.
The data are then packaged nicely in a leftAlignFormat, with (indexNum + “. “ + dishName,” $” + dishPrice) such that
e.g. (1. Chicken Rice $2.50) is shown.
Add Order
An add_order command can be used to add order to an orderList in Sales.
The following class diagram illustrates the relationship between the respective classes involved in the creation and execution of an add_order command.
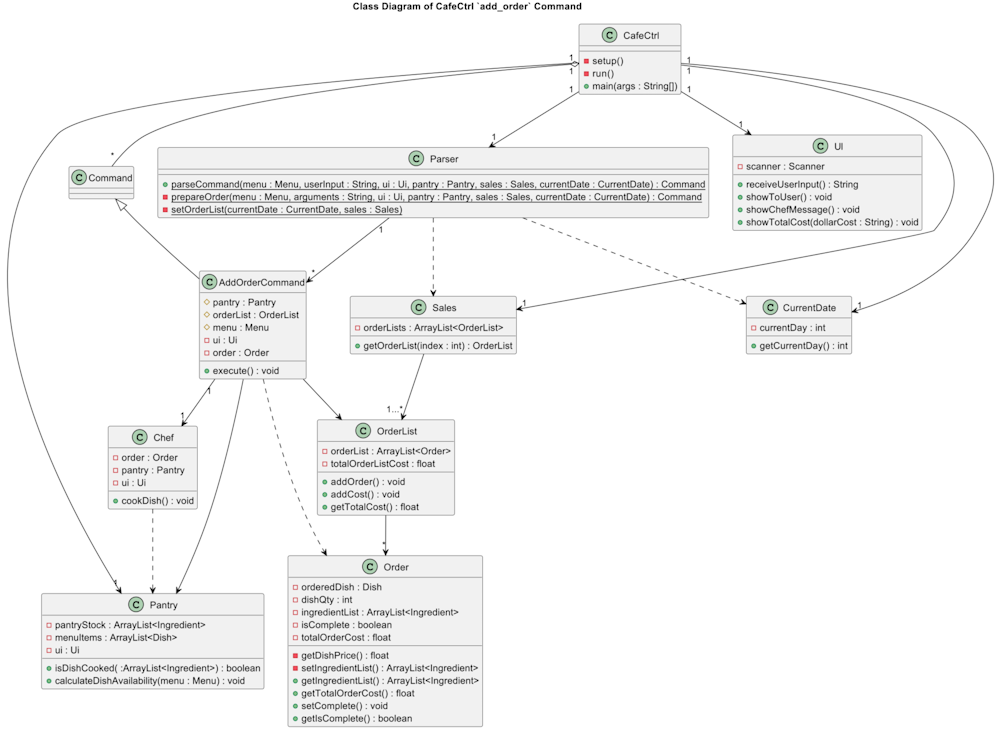
Figure 11: Execution of add_order Command Class Diagram
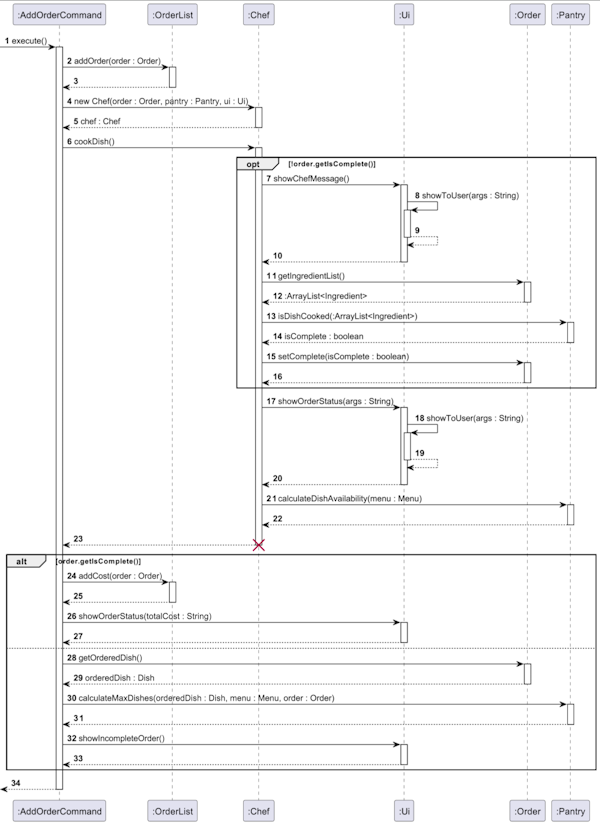
Figure 12: Execution of add_order Command Sequence Diagram
API: AddOrderCommand.java
When the execute() method of AddOrderCommand is invoked in Main, the parsed order object is added to the orderList.
A Chef object is then created to process the order by running cookDish().
This method first checks if the order has already been completed by running order.getIsCompleted().
If the order has not been completed, the showChefMesage() in the Ui component is triggered to display a message to show the user that the dish is being ‘prepared’.
An ArrayList of Ingredients, ingredientList, is retrieved from the order object by order.getIngredientList().
This ingredientList is passed into the pantry object in pantry.isDishCook() to process the ingredients used from the pantry stock.
This method returns a boolean, true if there is sufficient ingredients in the pantry, false is insufficient.
The order completeness status is updated by the boolean method, passing it into order.setComplete()
Returning to the AddOrderCommand, the order object is checked to be completed again by running order.getIsCompleted().
This verifies that the has been successfully completed.
After verifying that the order has been completed, the cost of the order is added to the total order by orderList.addCost().
The total cost is the shown to the user using ui.showOrderStatus.
Lastly, the pantry checks on the remaining ingredients in stock and calculates the potential future dishes able to be made with the remaining stock, using pantry.calculateDishAvailability().
If the order has been marked incomplete, the details of the orderedDish is retrieved from Order using order.getOrderedDish().
This is then passed on to the Pantry to figure out the missing ingredients, by pantry.calculateMaxDishes().
Lastly, the user is shown a message informing that the order has not been completed due to the lack of ingredients using ui.showIncompleteOrder().
Next Day
A next_day command can be used advance the current day.
The following class diagram illustrates the relationship between the respective classes involved in the creation and execution of a next_day command.
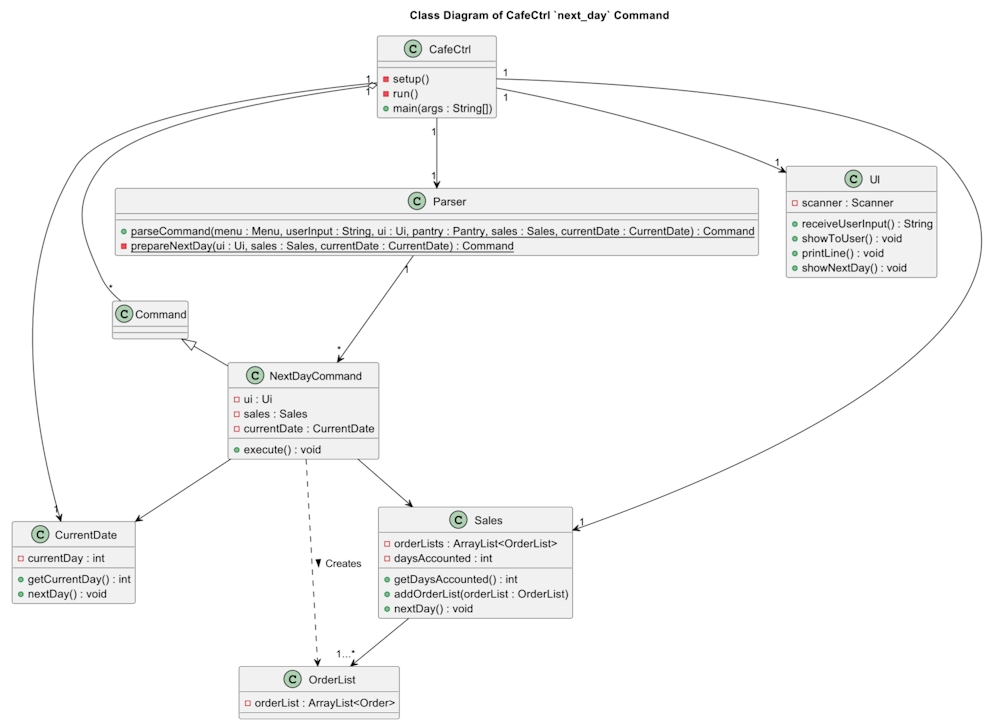
Figure 13: Execution of next_day Command Class Diagram
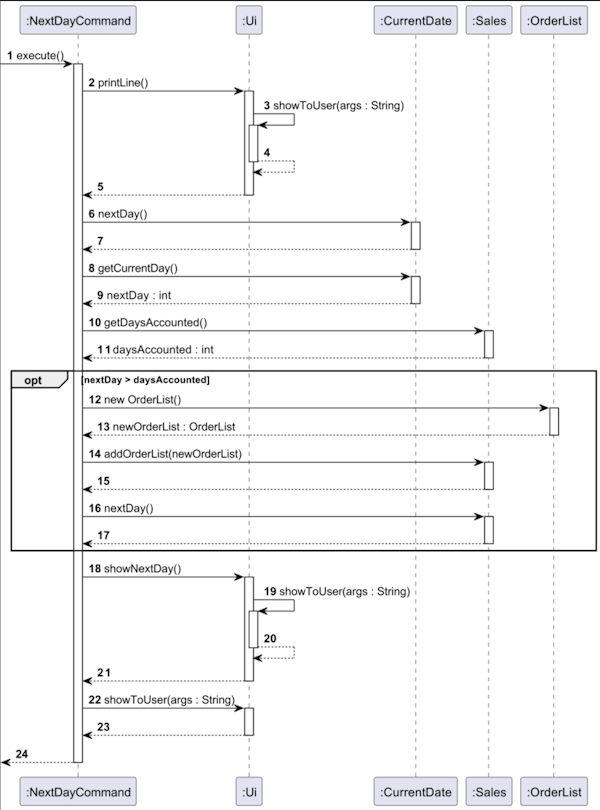
Figure 14: Execution of next_day Command Sequence Diagram
API: NextDayCommand.java
When the execute() method of NextDayCommand is invoked in Main, the day in the program is advanced by 1 day, by running currentDate.nextDay().
The next day data is retrieved from the CurrentDate object using currentDate.getCurrentDay().
This next day data is compared with the days accounted for in the Sales object, retrieved using sales.getDaysAccounted().
If the next day is more than the number of days accounted in sales, this means that there is no orderList prepared for the coming day.
A new OrderList object is created using new OrderList(), and added into the Sales object by running sales.addOrderList().
Following this, the day has been accounted and this is updated through sales.nextDay().
To end off the command, ui.showNextDay() is run to display a message to the user a prepared message for advancing the day.
The user is also shown the advanced day number.
Previous Day
A previous_day command can be used to recede the current day.
The following class diagram illustrates the relationship between the respective classes involved in the creation and execution of a next_day command.
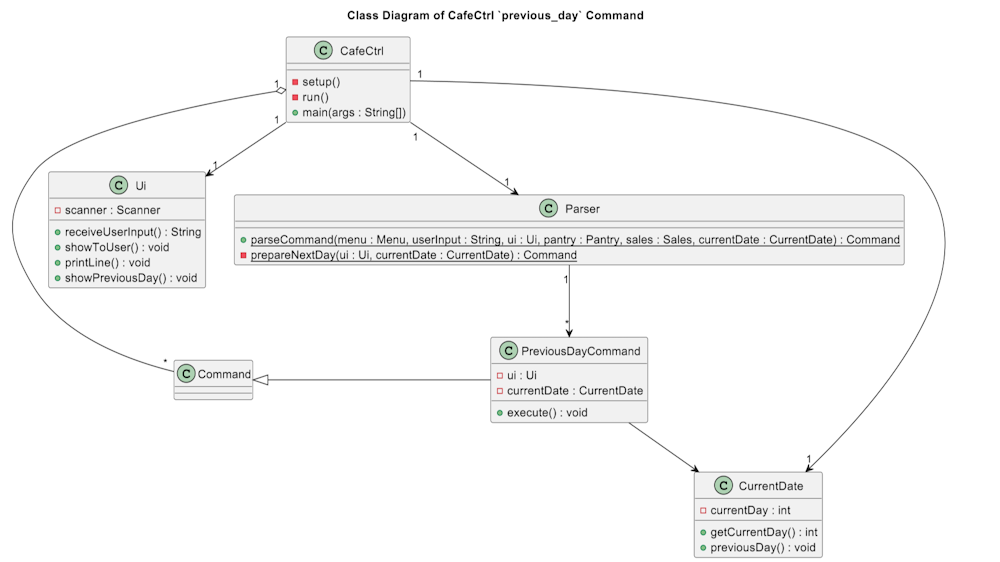
Figure 15: Execution of previous_day Command Class Diagram
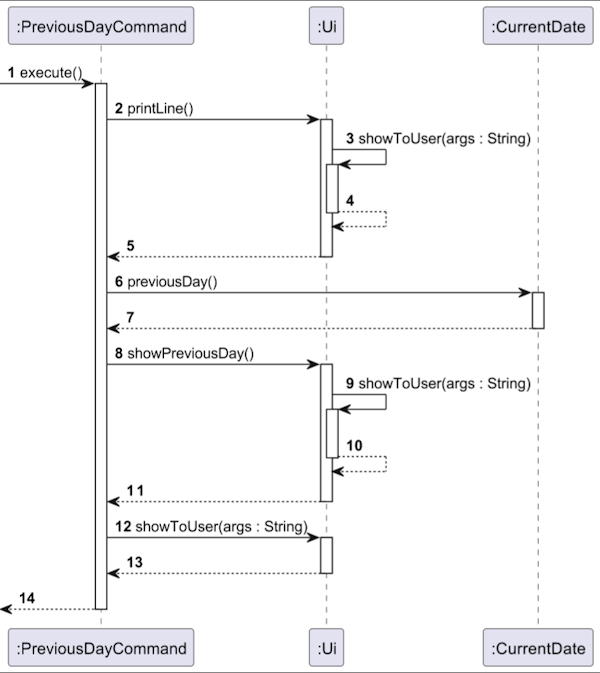
Figure 16: Execution of previous_day Command Sequence Diagram
When the execute() method of PreviousDayCommand is invoked in Main, the day in the program is receded by 1 day, by running currentDate.previousDay().
To end off the command, ui.showPreviousDay() is run to display a message to the user a prepared message for receding the day.
The user is also shown the receded day number.
List Ingredients

Figure 17: Execution of list_ingredient Command Sequence Diagram
API: ListIngredientCommand.java
The diagram above omits the showToUser() function in the Ui class to prevent unnecessary sophistication. Although it may seem tedious the steps are essentially as listed below:
- The sequence begins with the
Mainclass invoking theexecutemethod of theListIngredientCommandafter using a parser command. - The
ListIngredientCommandcommunicates with theMenuclass, invoking thegetMenuItemsList()method to retrieve a list of menu items. The function returns an ArrayList of objects of ‘Dish’ type. - The
ListIngredientCommandcommunicates with theUiclass, invoking theshowListIngredients()method to print out the list of ingredients used for the selected dish. - The
Uiclass communicates with theDishclass, invoking thegetIngredients()method to obtain the list of ingredients for the selected dish. TheDishclass responds with an ArrayList of objects of ‘Ingredient’ type to theUiclass. - There is a loop that iterates through each ingredient in the list. The
Uiclass interacts with theIngredientsclass, to obtain the name, quantity and unit of the ingredient. - The
Uiclass showcases the information to the user through theformatListIngredient()method.
List Sale By Day

Figure 18: Execution of list_sale Command Sequence Diagram
API: ListSaleByDayCommand.java
The diagram above omits the showToUser() function in the Ui class to prevent unnecessary sophistication. The steps are essentially as listed below:
- The sequence starts with the invocation of the
execute()method in theListSaleByDayCommandclass, which the invokes thesales.printSaleByDay()method. - The
Salesclass interacts with theOrderListclass to check if there are completed orders to be displayed. - If there are no completed orders or no orders at all, a message is shown to the user via the
Uiclass and the command’s execution ends. - If there are completed orders, the process continues to display it in a table format.
showSalesTop(): Display table headerorderList.printOrderList(): The OrderList iterates over each order, aggregates orders, and prints details for each aggregated order. For each aggregated order, details like dish name, quantity, and total order cost are retrieved from the Order class and shown to the user via the Ui class.showSalesCost(): Displays the total sales cost for the aggregated orders.showSalesBottom(): Displays the bottom of the table
- The List Total Sales command follows a comparable sequence, and as such, it will be excluded to avoid the repetition of multiple similar diagrams.
Pantry - isDishCooked()

Figure 19: Data Processing of isDishCooked() Function Used in add_order Command Sequence Diagram
API: Pantry.java
This section briefly explains how add_order checks if the order added is successfully cooked.
The steps are essentially as listed below:
- The sequence starts with the invocation of
isDishCooked()to thePantryclass, with a list of ingredients needed for the order. - For each ingredient in the dish,
isDishCooked()first obtains the quantity of the ingredients needed (usedQty) for the order as shown in step 4 and 5. - The function then attempts to get the Ingredient used from the current stock in the Pantry (
stockQty) as shown in steps 11 and 12.- If
usedIngredientFromStockis null, it means that the ingredient does not exist in the Pantry and the sequence ends with afalsebeing returned. - If
usedIngredientFromStockexists but the quantity is insufficient, - If
usedIngredientFromStockis found and the quantity is sufficient, the used quantity is deducted from the stock quantity in the Pantry and the sequence ends with atruebeing returned.
- If
- A
falseindicates that the order was unsuccessful while atrueindicates that the order was successful.
Pantry - calculateMaxDish()

Figure 20: Data Processing of calculateMaxDish() Function Used in add_order Command Sequence Diagram
API: Pantry.java
This section briefly explains how add_order checks if restocking of ingredients is needed.
The steps are essentially as listed below:
- The sequence starts with the invocation of
calculateMaxDish()to thePantryclass. - Steps 2 to 6 involves retrieving the ingredients used to make the dish.
- The function
calculateMaxDishForEachIngredientreturns an integer and assigns it to the variablenumOfDishwhich is the maximum number of dishes that can be cooked. - If the order is incomplete
- ingredients that need restocking will be passed into the
handleRestockfunction.
- ingredients that need restocking will be passed into the
- If the order is complete,
- ingredients that are unable to prep the next dish will be passed into the
handleRestockfunction.
- ingredients that are unable to prep the next dish will be passed into the
Delete Dish
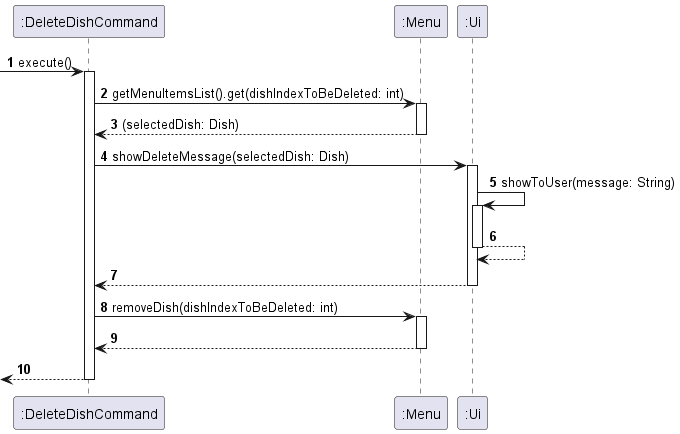
Figure 21: Execution of delete Command Sequence Diagram
When the execute() method of DeleteDishCommand is invoked in Main, it subsequently calls getMenuItemsList().get(dishIndexToBeDeleted) method on the Menu object to retrieve the Dish object to be deleted.
Following this, the showDeleteMesage() method in the Ui component is triggered to display a message to show the user which dish is about to be deleted.
Afterward, DeleteDishCommand calls removeDish(dishIndexToBeDeleted) of the Menu object to remove the selected dish at the index indicated by the user.
This sequence of actions orchestrates the flow of information and operations between Main, DeleteDishCommand, Menu, and Ui components, ensuring the seamless handling of the dish deleting functionality within the application.
DeleteDishCommand is implemented in such a way because:
- It promotes loose coupling between components. For instance,
Maindoesn’t need to know the details of how theexecute()ofDeleteDishCommandis executed or how the message is displayed inUi. - Each component has a specific role and responsibility.
Mainis responsible for receiving user input and invokingexecute(),DeleteDishCommandis responsible for encapsulating the delete operation,Menuis responsible for managing the menu items, andUiis responsible for displaying messages to the user. This separation of concerns makes the code more maintainable and easier to understand.
Edit Price
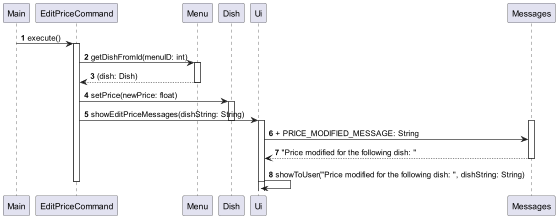
Figure 22: Execution of edit_price Command Sequence Diagram
When the execute() method of EditPriceCommand is invoked in Main, it subsequently calls the setPrice() method on the Dish object to modify the price of the specific dish. Following this, the showEditPriceMessages() method in the Ui component is triggered to retrieve and display a message from Messages related to the successful execution of the price modification process. This sequence of actions orchestrates the flow of information and operations between the Main, EditPriceCommand, Dish, and Ui components, ensuring the seamless handling of the price editing functionality within the application.
View Total Stock
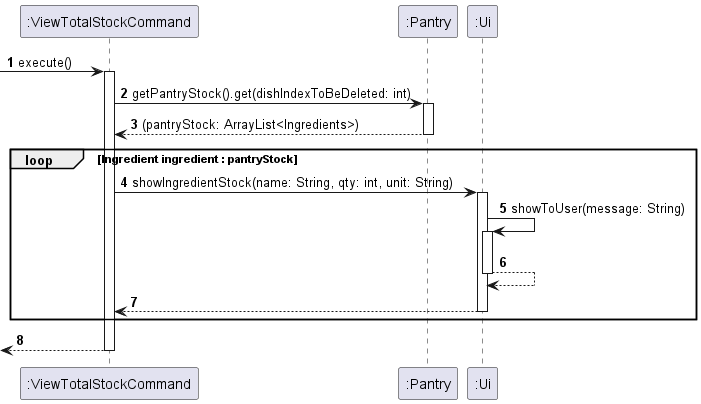
Figure 23: Execution of view_stock command
API: ViewTotalStockCommand.java
When the execute() method of ViewTotalStock is invoked, an ArrayList of Ingredients are retrieved through the method getPantryStock. For each ingredient in the ArrayList, ViewTotalStock calls showIngredientStock from Ui to print out the list of ingredients in the ArrayList.
Buy Ingredient
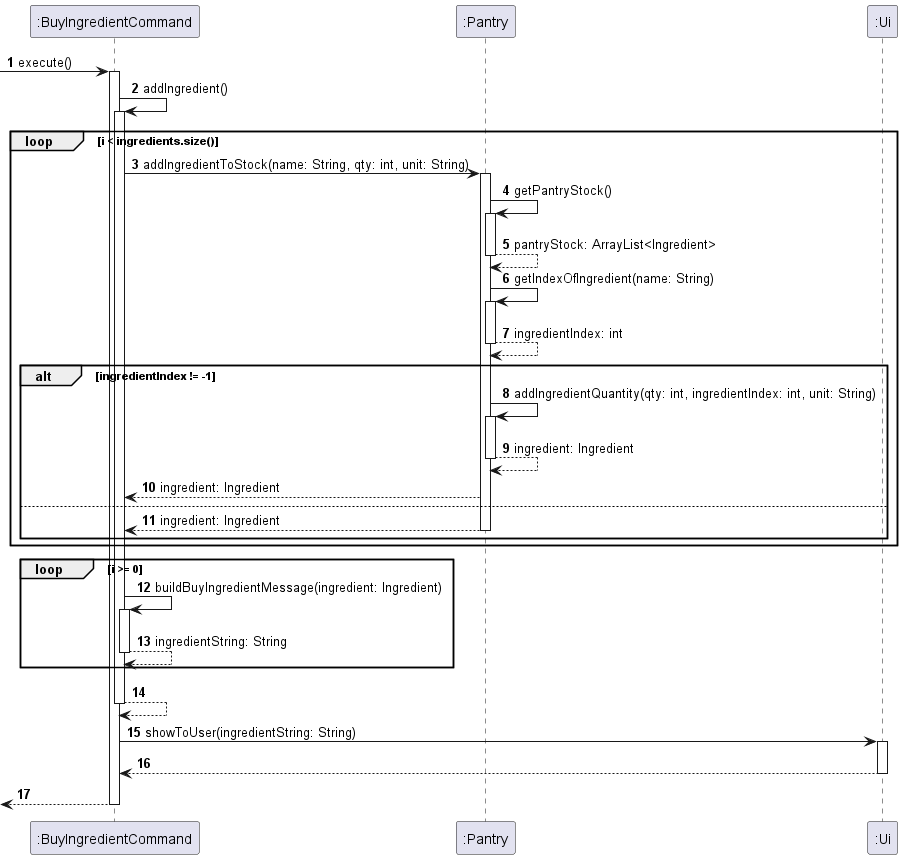
Figure 24: Execution of buy_ingredient command
API: BuyIngredientCommand.java
When the execute() method is invoked
addIngredientinBuyIngredientCommandis called- Looping from the first to the last element in an ArrayList of Ingredients called
ingredients,addIngredientToStockfromPantryis invoked - First,
pantryStockis retrieved andgetIndexOfIngredientis called to check if the new ingredient exists inpantryStock - If ingredient exists (
ingredientIndex != -1),addIngredientQuantityis called to update the quantity of the existing ingredient - Else, a new
ingredientobject is returned - Looping from the last to the first element in
ingredients, the ingredient is added to the string to be printedingredientStringusing thebuildBuyIngredientMessagemethod which ignores repeated ingredients in the list - Finally,
ingredientStringis shown to the user throughshowToUsermethod ofUi
Help

Figure 25: Execution of help Command Sequence Diagram
API: HelpCommand.java
When the execute() method of HelpCommand is invoked in Main, it subsequently calls the showHelp() method in Ui. In showHelp(), messages related to command usage will be retrieved and be printed out using by self-invoking showToUserWithSpaceInBetweenLines(messages: String...).
Future Enhancements
Create an interface for Pantry
- Problem:
Pantryclass is used in testing of methods such asaddOrder. With this implementation, we are unable to test theaddOrderfeature in isolation as any bugs inPantryclass could potentially affect the behaviour ofaddOrderfeature. - Solution: Instead of using the concrete
Pantryclass,addOrdercould use an interfacePantryUtilto access the required methods. A hard coded class that is less prone to bugs can be used to substitute the actualPantryclass by implementing aPantryUtilinterface.
With this, we are able to test the method in isolation as we have removed the dependency on the actualPantryclass.Make
Uiclass singleton - Problem: As we need to use the same
Uiinstance for all methods to avoid repeated instantiation ofScannerwhich could slow down the application, the sameUiinstance is being passed to the constructor for allCommandclasses. This makes the parameters for the constructor looks too long. -
Solution: Implement a static
getInstancemethod inUiclass which, when it is called for the first time, creates a new instance ofUiand store it in a static constant in theUiobject. The method will return theuiobject in the constant for subsequentgetInstancecall.
With this implementation, we no longer need to passuiaround as we can access the sameuiobject by callinggetInstance.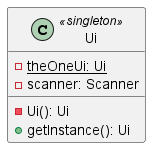
Figure 26: singleton Ui Class Diagram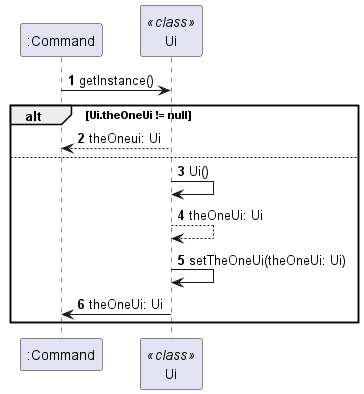
Figure 27:getinstancecall onUiSequence diagram
Product scope
Target user profile
Café proprietors who love typing on CLI and are seeking for a software solution to optimize the management of their café’s operations.
Value proposition
Our product aims to optimize managing of inventory and cash flow in a restaurant. Our CLI platform empowers users to streamline stock inventory, menu and orders. Users will also briefly be able to gain valuable insights through comprehensive sales reporting, enabling them to analyze sales trends and calculate revenue/profit margins, eliminating the need for cross-platform management.
Requirements
Non-functional requirements
- This application requires the use of Java 11.
- This application should work on most mainstream OS.
- This application should be able to work offline
User stories
| Priority | As a … | I want to … | So that I can… |
|---|---|---|---|
* * * |
cafe owner who is responsible for coming up with new dish | add dish to the menu | add new dish to the menu |
* * * |
cafe manager is responsible for managing pantry stock | track the inventory levels for ingredients and supplies | know what ingredients I need to restock |
* * * |
cafe manager is responsible for managing pantry stock | buy ingredients | restock low stock ingredients |
* * * |
cafe owner who is also the chef | view the ingredients needed for a dish | know what ingredients to use when cooking a dish |
* * * |
cafe owner who wants to maximise profit | edit the price of the dish | increase the price of the dish when there is inflation |
* * * |
cafe owner who cares about the sales of the cafe | view the sales of the cafe | know whether my cafe is profiting |
* * * |
cafe owner who works 7 days a week | save the menu, pantry stock and order | have access to the same menu, pantry stock and orders when I go back to work |
* * * |
cafe owner who is responsible for placing order | add order | ask the chef to cook the order |
* * |
cafe manager who is responsible for drafting the menu | view the menu | keep track of what dish we have |
* * |
cafe owner who working 7 days a week | fast forward to the next day | close the cafe and call it a day when I am tired |
* * |
clumsy cafe owner who works 7 days a week | go back to the previous day | still accept order from the previous day if I accidentally fast forward to the next day |
* * (to be implemented) |
cafe owner who is interested to know the popularity of the menu items | view the rank of popularity based on order history | adjust the pricing or remove the dish that is not popular |
Glossary
- Mainstream OS: Windows, Linux, Unix, OS-X
- Qty: Quantity
- CLI: Command Line Interface
Instruction for manual testing
Note: These instructions only provide a starting point for testers to work on; testers are expected to do more exploratory testing.
Launch and shutdown
- Initial launch
- Download the jar file and copy into an empty folder
- Double-click the jar file Expected:
Hello! Welcome to
_/_/_/                _/_/              _/_/_/    _/                _/
_/          _/_/_/    _/        _/_/    _/        _/_/_/_/  _/  _/_/  _/
_/        _/    _/  _/_/_/_/  _/_/_/_/  _/          _/      _/_/      _/
_/        _/    _/    _/      _/        _/          _/      _/        _/
_/_/_/    _/_/_/    _/        _/_/_/    _/_/_/      _/_/  _/        _/
------------------------------------------------------------------------
>
- To exit the application, input
byein the CLI
Editing the price of a dish
- Prerequisites: Have at least one dish in the menu. Dish can be added with the following command:
add name/chicken rice price/3.00 ingredient/rice qty/200g, ingredient/chicken qty/100g - Edit price of the dish by using the following command:
edit_price dish/1 price/4.50 - Expected outcome:
Price modified for the following dish: chicken rice $4.50 - Exit the application with command:
bye - In the menu.txt file under data folder, the following data can be found:
chicken rice | 4.5 | rice - 50 - g | chicken - 100 - g